Small Space Magic: 7 Clever Ways to Organize Awkward Alcoves and Nooks
Turn dead space into design features. A deep dive into architectural hacks for utilizing the weirdest corners of your home.
Mar 2, 2026 - Written by: Linda Wise

You know that spot. The one that stares at you. Maybe it’s that jagged recess next to the fireplace that’s too narrow for a bookcase but too deep to ignore. Or perhaps it’s the triangular void beneath the stairs that currently serves as a graveyard for mismatched shoes and a vacuum cleaner you swore you’d fix three years ago.
Every home, whether it’s a sprawling Victorian or a compact urban new-build, has them: architectural afterthoughts. Dead zones.
I’ve spent the better part of my career arguing that these aren’t actually flaws. They are opportunities disguised as headaches. When you stop looking at an alcove as a waste of square footage and start viewing it as a micro-room waiting to happen, the dynamic of your entire home changes. You don’t need a renovation budget the size of a luxury sedan to reclaim these spaces; you just need a bit of ingenuity and a willingness to break a few design rules.
We are going to dissect seven architectural hacks that turn these awkward voids into high-functioning assets. We aren’t just talking about shoving a basket in a corner. We are talking about structural integration, lighting psychology, and material selection that makes it look like the house was built around your storage needs.
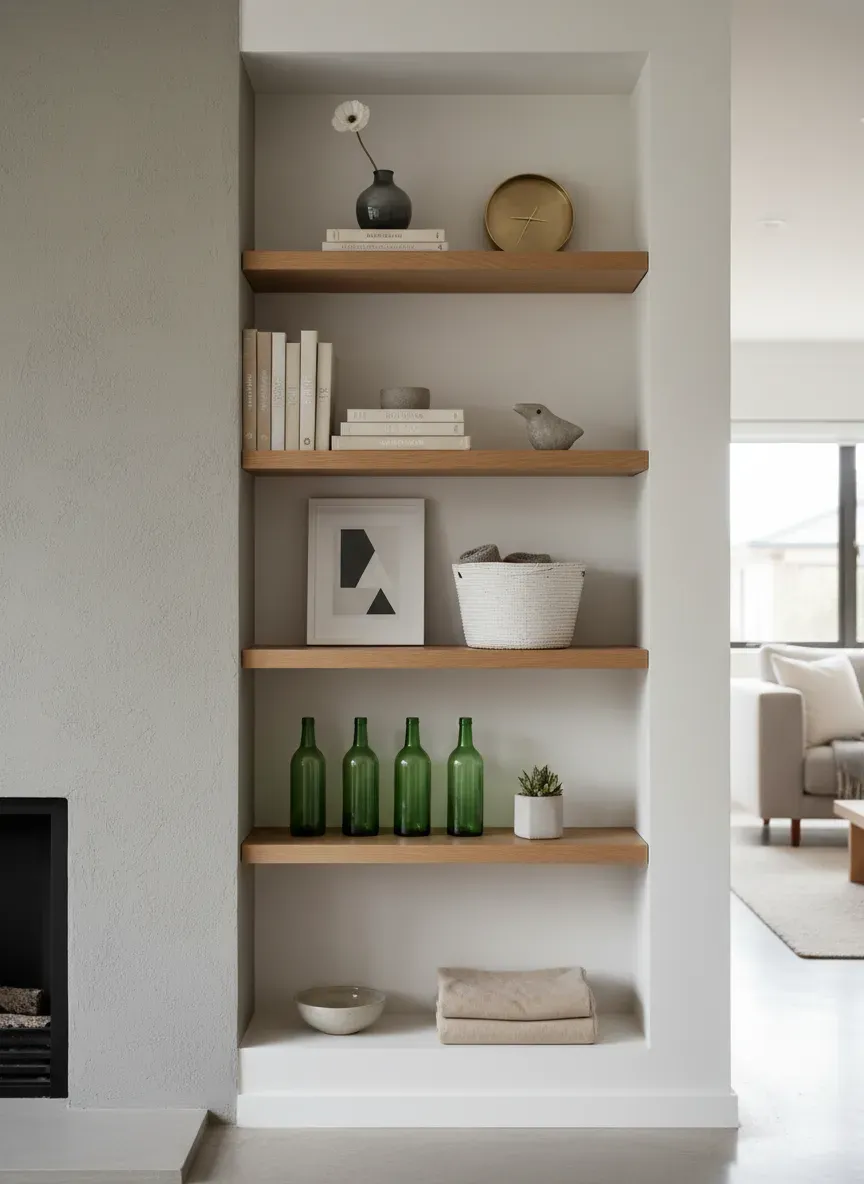
1. The Vertical Library: Conquering the Chimney Breast Gap
If you live in a pre-war home or a property with a central fireplace, you likely battle the “chimney breast recesses.” These are the twin alcoves flanking the fireplace. The amateur move here is to buy a freestanding bookshelf that almost fits.
The problem? “Almost” looks cheap. It creates shadow lines and dust traps that visually clutter the room.
To achieve true small space magic, you need to go built-in. But here is the trick: you don’t necessarily need a carpenter. You can achieve a bespoke look by using the full depth of the recess.
The Floating Shelf Strategy
The key to making this look expensive is thickness. Thin, 1-inch planks look like temporary storage. Chunky, 3-inch shelves look like architecture. I generally recommend using a cleat system (wooden battens screwed into the three walls of the alcove) and sliding a hollow-core wood shelf over them.
Pro Tip: “Always paint the back wall of the alcove a different color than the shelves. If your room is white, paint the alcove charcoal or navy. It creates instant depth and turns your storage into a gallery wall.”
However, you have to be careful about spacing. If you cram too many shelves in, the room feels claustrophobic. If you space them too widely, you lose utility. When planning your layout, I highly recommend consulting a guide on understanding standard depth and height measurements to ensure your favorite hardcovers actually fit without overhang.
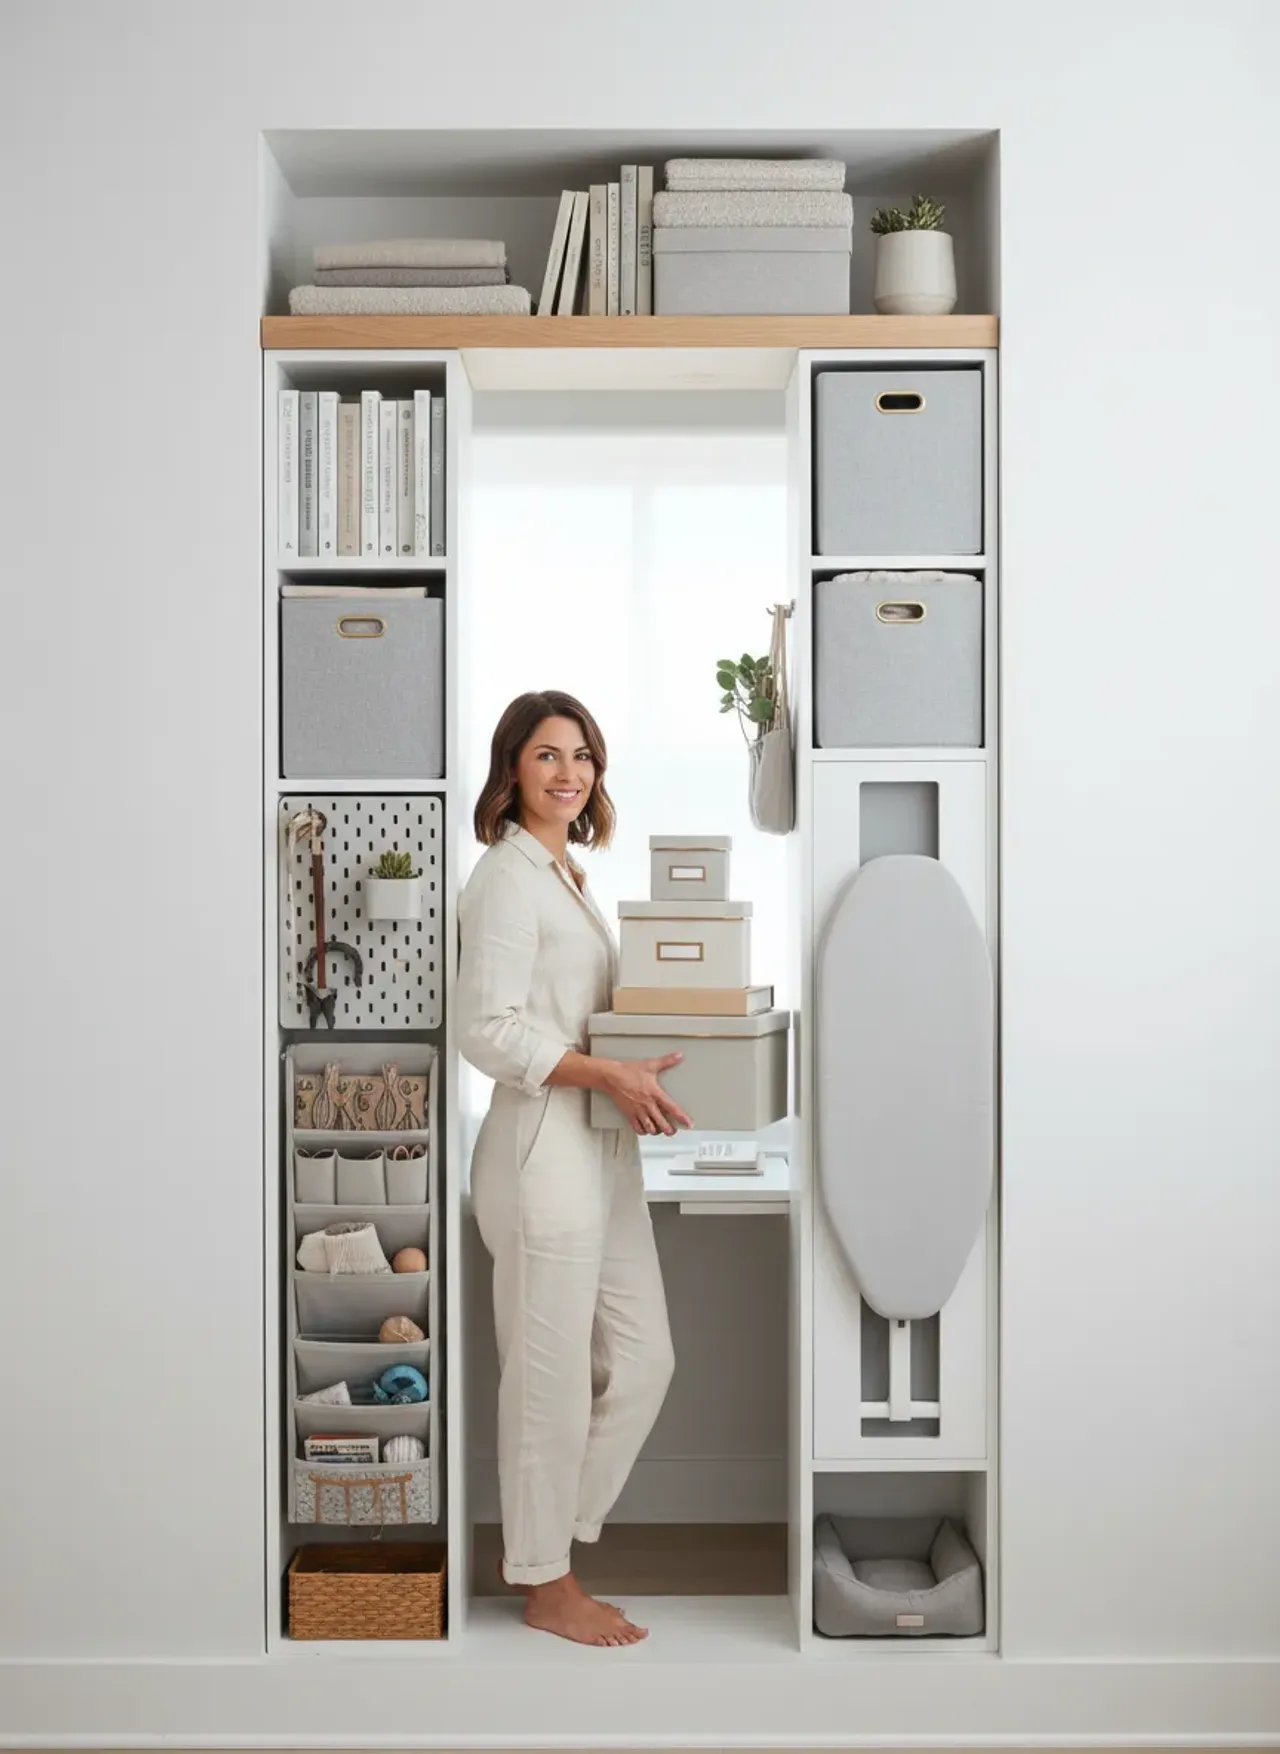
2. The “Cloffice”: The Closet-Office Hybrid
The shift to remote work left many of us scrambling for desk space. If you have a shallow closet or a deep alcove in a guest room, you have a home office. The “Cloffice” is my favorite solution for clients who want to shut the door on their work at 5:00 PM.
The challenge here is usually depth. A standard desk is 24 to 30 inches deep. A standard reach-in closet is often only 24 inches deep. If you install a desk, you can’t close the doors if your chair is in the way.
The Slide-Out Solution
The workaround is a cantilevered or slide-out desktop. By using heavy-duty drawer slides, you can have a desktop that extends out into the room when you’re working and retracts when you’re done.
Lighting is the other non-negotiable here. A closet has no natural light. You cannot rely on the room’s overhead bulb; you will be working in your own shadow. You need under-shelf task lighting. If you want the best experience without hiring an electrician, I highly recommend checking out the Black+Decker PureOptics LED Light Bar. It mounts easily under a shelf and provides the crisp, high-Kelvin light necessary for focus, mimicking daylight.
3. The Under-Stair Void: Structural Integration
This is the white whale of storage. The triangle under the stairs is often vast, but the geometry is a nightmare. The standard approach is to put a door on the tallest part and turn it into a dark, scary cupboard where holiday decorations go to die.
I prefer a more aggressive approach: The Pull-Out Pantry.
Instead of stepping into the cupboard, bring the cupboard out to you. By installing deep drawers or rolling vertical cabinets on heavy-duty casters, you utilize the entire depth of the staircase width (which is usually around 36 inches).
Weight Matters
This is where things get technical. Stairs are dynamic structures; they vibrate and settle. When you start building heavy storage underneath them, you must ensure you aren’t compromising the stringers (the structural supports of the stairs). Before you start drilling into studs or loading up shelves with heavy canned goods, you need to be proficient in calculating load-bearing capacity and understanding weight distribution. A sagging stair storage unit is not just ugly; it’s dangerous.
4. The Micro-Mudroom: Utilizing Narrow Hallway Indents
I’ve seen hallways with strange 10-inch indents—relics of old HVAC runs or plumbing chases. It seems useless, right? You can’t put a console table there.
Wrong. You can create a “Micro-Mudroom.”
Verticality is your best friend here. Ten inches is enough depth for a single row of shoe storage if you use tilt-out bins, or a high row of hooks for coats.
The “Board and Batten” Hack
To make this random indent look intentional, install board and batten paneling halfway up the wall within the nook. Install hooks on the top rail. Place a narrow bench or a floating shelf at the bottom for bags.
The spacing of your hooks is critical here. If they are too close, coats bulk up and protrude into the walkway. If they are too far apart, you waste space. It’s a delicate balance. I’ve written extensively about the ideal spacing for hooks or shelves, and getting this metric right is the difference between a cluttered mess and a streamlined entry.
- Key Takeaways:
- Use tilt-out shoe cabinets for depths under 12 inches.
- Anchor hooks into studs or use heavy-duty toggles; winter coats are heavy.
- Mirror the back of the nook to bounce light and make the hallway feel wider.
5. The Window Seat: Dormer Magic
Dormer windows in attics or upper stories often create deep, tunnel-like spaces that feel disconnected from the rest of the room. They are notoriously hard to furnish.
The only logical answer is the window seat. But let’s elevate it.
A standard window seat is a box with a lid. It’s fine, but lifting a cushion and a heavy plywood lid to access storage is annoying. You won’t use it. Instead, opt for drawers.
Drawers allow you to access linens or off-season clothes without disturbing the styling on top of the seat. For the cushion, don’t just buy a generic pad. Spend the money on high-density foam (at least 3 inches thick) and a durable, stain-resistant fabric. This turns a “storage box” into actual furniture.
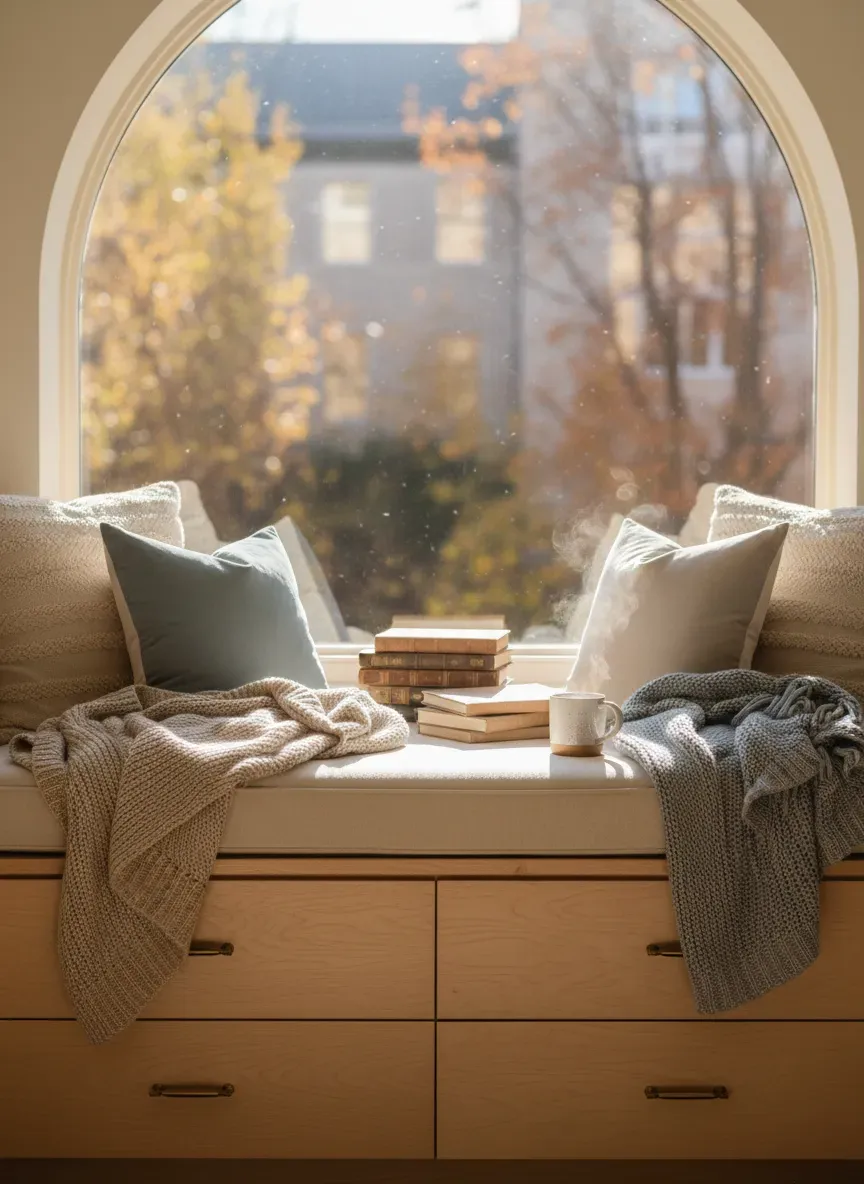
The Bottom Line: If the window seat isn’t comfortable, it becomes just another shelf. The ergonomics of the foam density and the angle of the backrest (if you build one) determine if you’ll actually read there.
6. The “Floating Bar”: Entertaining in the Ether
So you have a weird corner in the dining room or living area. It’s too small for a chair. Enter the floating bar.
This is all about glass and light. Unlike the mudroom or the library, this storage is meant to sparkle. Use glass shelves instead of wood. Glass allows light to pass through, keeping the nook feeling airy.
The Hardware Factor
Because you are displaying fragile bottles and glassware, stability is paramount. You want brackets that grip the glass securely but remain unobtrusive.
For the wine bottles themselves, don’t just line them up on a shelf where they can roll. I’ve had great success using the Bariboo Wall Mounted Wine Rack. It turns the bottles into art, uses vertical space efficiently, and keeps the corks moist (essential for wine longevity).
If you have an electrical outlet nearby, adding a small beverage cooler at the base of the nook anchors the space visually. If not, a beautiful rolling cart tucked into the lower half of the alcove works wonders.
7. The Utility Sliver: The Broom and Vacuum Garage
Let’s talk about that irritating 6-inch gap between your refrigerator and the wall. or the slice of space next to the washing machine.
This is prime real estate for what I call “The Utility Sliver.”
In the kitchen, this is a slide-out spice rack or pantry. You can build a custom rolling tower on casters that slides perfectly into the gap.
In the laundry room or hallway, this is where the brooms live. But leaning brooms against a wall is a recipe for a domino effect of falling cleaning supplies. You need grip.
I swear by the Command Broom Gripper. It’s simple, damage-free, and holds the handle securely. By mounting these staggered on the wall of a narrow nook, you can store a broom, a mop, and a duster in a space no wider than 6 inches.
The Art of Camouflage vs. Celebration
When organizing these awkward spaces, you have a binary choice: Hide it or Highlight it.
Hiding It (The Camouflage Technique)
If the nook is filled with ugly items (cleaning supplies, router cables, printers), your goal is seamless integration.
- Paint Drenching: Paint the shelves, the walls, and the trim the exact same color as the surrounding room.
- Doors: Use flat-panel doors with touch latches (no handles). This makes the storage look like a solid wall.
- Curtains: In a cottage-style home, a heavy linen curtain on a brass rod can hide a multitude of sins beneath a counter or in an alcove.
Highlighting It (The Jewel Box Technique)
If the nook is for books, art, or glassware, treat it like a museum display.
- Contrast: Use wallpaper on the back wall of the nook. A bold botanical print in a small space packs a huge punch without overwhelming the room.
- Texture: Line the shelves with leather or velvet. It sounds excessive, but it stops things from sliding and adds a tactile element that screams luxury.
- Architraves: Frame the nook with molding. Adding a simple trim around the edge of an alcove makes it look like a purposeful architectural feature rather than a hole in the wall.
Lighting: The Secret Weapon
I cannot stress this enough: Dark corners look smaller. Dark corners look cluttered.
If you cannot hardwire a sconce into your nook, you must use rechargeable LED puck lights or motion-sensor strips. Place them at the front of the shelf, aiming backward. This washes the back wall with light and reduces the “black hole” effect.

For deep nooks, consider a small pendant light. It draws the eye up and creates a sense of height. It transforms the space from “storage area” to “destination.”
Common Pitfalls to Avoid
Throughout my years of fixing DIY disasters, I see the same mistakes repeatedly when people attempt to tackle these spaces.
-
Ignoring the Baseboard: If you buy a freestanding unit to push into an alcove, the baseboard (skirting board) will prevent it from sitting flush against the wall. You end up with a gap where things fall.
- The Fix: Either scribe the unit to the baseboard (cut a notch in the unit) or remove the baseboard inside the alcove for a built-in fit.
-
Overloading Shelves: Just because a shelf fits in the nook doesn’t mean it can hold your Encyclopedia Britannica collection. Long spans without support will sag.
- The Fix: If your shelf spans more than 30 inches, increase the thickness of the wood or add a central support bracket.
-
Forgetting Airflow: If you are enclosing electronics (routers, gaming consoles, mini-fridges) in a nook, they generate heat.
- The Fix: Drill ventilation holes in the cabinetry or install a small USB fan to keep air circulating.
Final Thoughts: It’s All About Intent
The difference between a “weird corner” and a “design feature” is intent. When you approach these spaces with a plan—measuring accurately, selecting the right materials, and lighting them properly—you aren’t just organizing; you are increasing the value of your home.
You are mastering the art of organizing awkward alcoves and nooks by refusing to accept dead space as a reality. Whether it’s a reading nook that invites you to curl up on a rainy Sunday, or a hidden utility closet that keeps your cleaning gear out of sight, these small pockets of order bring a sense of calm to the entire household.
Look around your room right now. Spot that awkward gap. That’s not a problem. That’s your next project.