Maximize Your Space: The Ultimate Guide to Choosing Slim Furniture for Tight Hallways
Discover expert strategies for reclaiming your narrow entryway. We break down the best slim furniture choices, visual tricks, and layout hacks to transform tight hallways.

Mar 2, 2026 - Written by: Linda Wise

The hallway is the handshake of your home. It’s the first thing you see when you wrestle the door open with three bags of groceries, and it’s the last glimpse guests get before they leave. Yet, in modern architecture and historic renovations alike, this critical artery is often treated as an afterthought—a dark, claustrophobic tunnel where square footage goes to die.
I’ve walked through countless homes where the entryway feels less like a welcoming embrace and more like an obstacle course. You know the drill: the awkward sidestep past a bulky dresser, the inevitable hip-check against a coat rack that protrudes just two inches too far. It doesn’t have to be this way.
The secret isn’t just “buying smaller stuff.” It is an architectural philosophy involving depth perception, vertical utility, and the rigorous selection of furnishings that respect the flow of traffic. When you master the art of selecting ultra-narrow furnishings, you don’t just clear a path; you actually expand the perceived volume of your home.
Let’s dismantle the myths of narrow living and rebuild your hallway into a high-functioning design triumph.
The Mathematics of the “Hip-Bump” Zone
Before you even open a browser tab to shop, you need to understand the physics of your corridor. Most people measure wall-to-wall width and assume they can fill the remaining space. This is a fatal error.
You need to measure for flow, not just fit.
In interior design ergonomics, the “comfortable passing width” for a single person is generally cited as 36 inches. However, in a hallway, you often need closer to 42 inches if you want two people to squeeze past each other, or if you’re carrying a laundry basket. If your hallway is only 40 inches wide to begin with, placing a standard 16-inch deep console table leaves you with a 24-inch path. That’s not a hallway; that’s a squeeze chute.
The 10-Inch Rule
I’ve personally found that the “Golden Zone” for hallway furniture depth sits between 8 and 12 inches. Once you exceed 12 inches in a standard corridor (typically 36 to 48 inches wide), you start encroaching on psychological space. The walls feel like they are closing in.
Pro Tip: Tape it out. Before buying anything, use blue painter’s tape on the floor to mark the footprint of the potential furniture. Then, walk past it carrying a bag. If you instinctively turn your shoulder, the piece is too deep.
When you are adhering to these strict limits, you must verify standard depth and height measurements for every category of furniture you consider. A “slim” label on a product page is subjective; the tape measure is absolute.
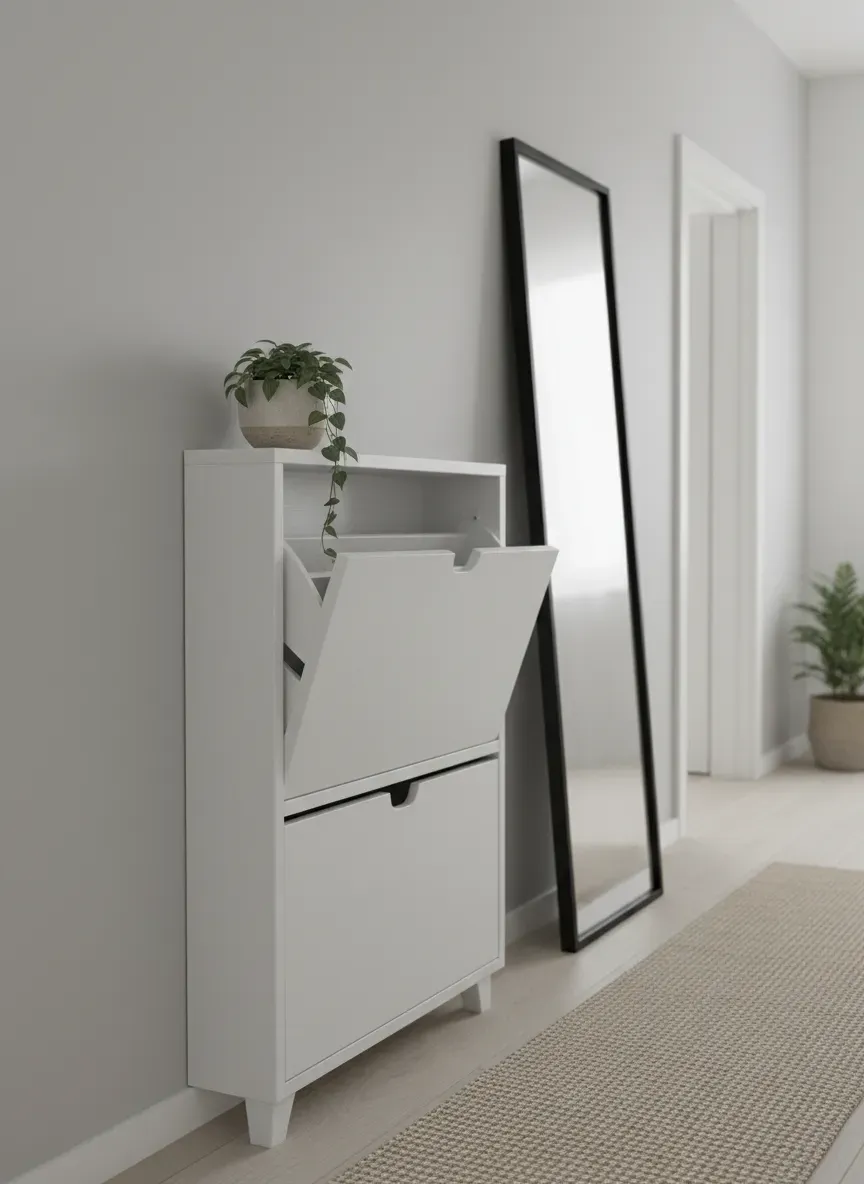
The Shoe Storage Revolution: Tilt-Out Cabinets
If there is one item that creates clutter chaos in a narrow hall, it is the shoe pile. It spreads. It trips. It ruins the aesthetic. Traditional shoe racks are usually too deep because they store shoes horizontally (toe to heel).
Enter the tilt-out shoe cabinet. This is, without exaggeration, the single greatest invention for narrow entryways.
By storing shoes vertically (heel down, toe up) in a drop-down drawer, these units cut the required depth in half. You can store a size 12 sneaker in a cabinet that is only 7 to 9 inches deep. It defies standard geometry, yet it works perfectly.
Why Closed Storage Wins
Open shoe racks look messy, no matter how organized you are. A closed cabinet creates a flat, clean surface that visualizes as a “wall” rather than “clutter.”
If you want the best experience, I highly recommend checking out the Baxton Studio Simms Shoe Cabinet. It’s a stellar example of how you can pack significant storage capacity into a footprint that barely protrudes into the room. The sleek lines prevent it from feeling heavy, which is crucial when you don’t have space to spare.
The Floating Console Strategy
When floor space is at a premium, the floor itself becomes a precious commodity. The more floor you can see, the larger the room feels. This is why heavy, blocky furniture makes a small hallway feel suffocating.
Legs are okay, but floating is better.
Wall-mounted console tables are the apex predator of slim design. By eliminating legs entirely, you remove visual friction. The eye travels underneath the unit to the baseboard, tricking the brain into thinking the hallway is wider than it is.
Load-Bearing Realities
Here is where things get technical. When you mount a console that will hold keys, mail, a vase, and maybe a leaning mirror, you are exerting “shear force” on the wall. You cannot just drive a drywall screw in and hope for the best.
You must understand the structural integrity of your wall. Are you drilling into studs? Are you using toggle bolts for hollow drywall? If you are planning to place heavy ceramic bowls or a solid wood slab on floating brackets, reviewing the basics of calculating load-bearing capacity is non-negotiable. A sagging console is a design tragedy; a fallen one is a liability.
The “Ghost” Console
If you must have legs—perhaps you are renting and can’t drill massive holes—consider acrylic or “ghost” furniture. A slim Lucite console table provides the surface area you need but virtually disappears visually. It reflects light, adding a shimmer that brightens dark corridors, and it imposes zero visual weight on the space.
Verticality: The Unsung Hero of the Narrow Hall
When you can’t build out, you must build up. However, the mistake most people make is placing hooks and shelves at eye level and leaving the rest of the wall blank. This creates a cluttered band around the middle of the room while wasting the prime real estate above and below.
High-Low Zoning
Think of your wall in zones:
- The Shin Zone (0-18”): This is for shoe benches or boot trays.
- The Hand Zone (30-40”): This is for console tables, key drops, and bag hooks.
- The Eye Zone (60-70”): Mirrors and artwork.
- The Storage Zone (70”+): High shelves for seasonal items (hats, scarves in summer).
By spreading out functionality, you reduce the bulk at any single point.
If you are looking for a unit that combines these zones without eating floor space, take a look at the Vasagle Industrial Coat Rack and Bench. While some models are deeper, looking for their specifically “slim” or “narrow” iterations can provide a place to sit, hang, and store, all within a compact footprint.
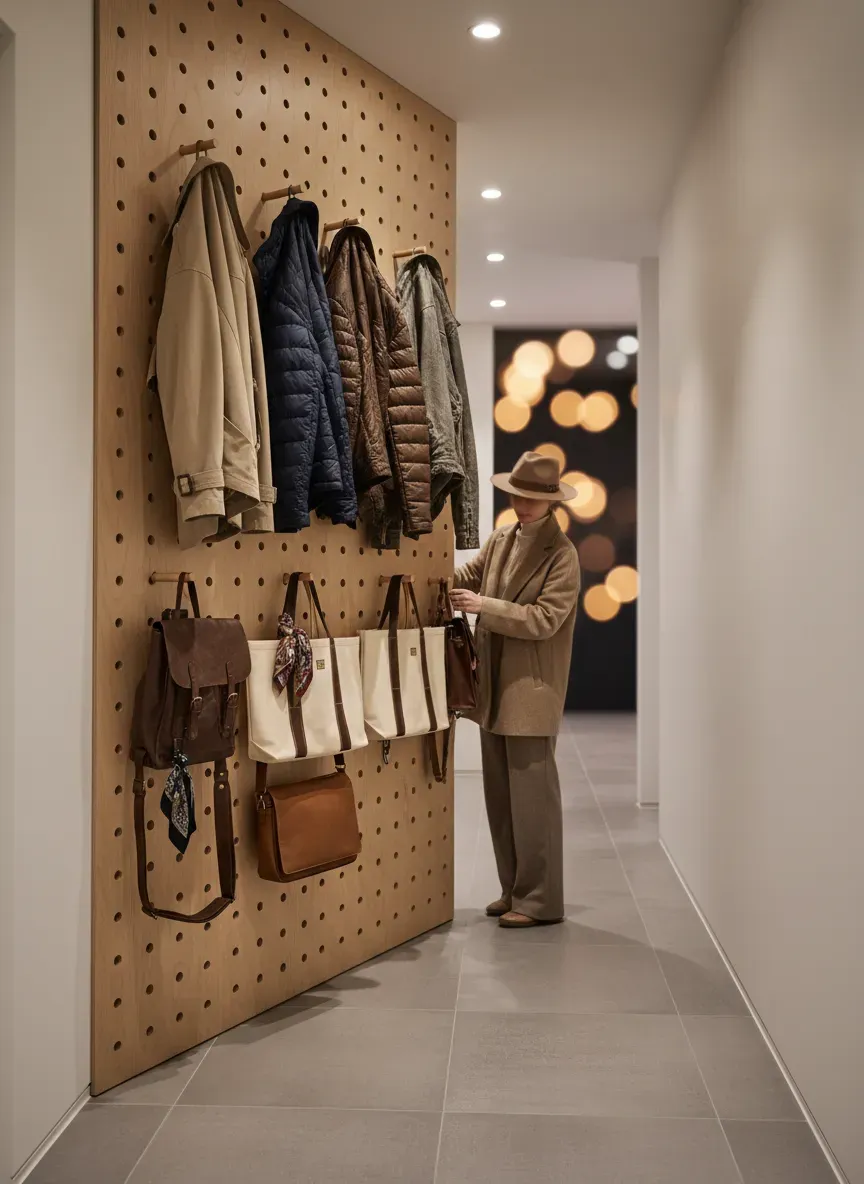
The Pegboard Potential
Don’t sleep on pegboards. Once relegated to the garage, high-end wooden or metal pegboards allow for modular, ultra-slim storage. You can move hooks and small shelves around as your needs change (winter coats vs. summer totes) without re-drilling holes.
Visual Expansion: Mirrors and Lighting
You’ve likely heard that mirrors make a room look bigger. But in a narrow hallway, placement is everything.
If you place a mirror at the end of a long, narrow hallway, you elongate the tunnel, making it feel infinite but not necessarily wider. To combat the “bowling alley” effect, you should place a large mirror on one of the side walls. This visually punches a hole in the wall, doubling the perceived width.
The Lighting Trap
Slim furniture is useless if it casts monstrous shadows. In tight spaces, overhead lighting can be harsh. Sconces are often too deep (protruding 4-6 inches creates a head-banger hazard).
Look for flat-panel LED wall lights or recess your lighting. If you use a table lamp on your slim console, choose one with a narrow, oval shade rather than a round one. A round shade will force the console to be pulled away from the wall, wasting inches.
Spacing and Rhythm: Avoiding the Cluttered Tunnel
One of the most difficult aspects of styling a narrow hallway is resisting the urge to over-fill it. Just because you can fit a row of hooks, a bench, and a shoe cabinet, doesn’t mean you should.
The Rule of Gaps
You need negative space. If you crowd your furniture, the hallway becomes a storage unit. I always advise leaving significant gaps between distinct zones. If you have a coat rack, leave two feet of empty wall before the next element.
This relates heavily to ideal spacing considerations. When hooks or art pieces are jammed together, the visual noise creates anxiety. When they are spaced generously, the hallway feels intentional and calm.
Key Takeaway: In a narrow space, “empty” is an active design element. It is the breathing room that allows the slim furniture to shine.
Material Matters: Durability in High Traffic
In a living room, you might not brush against the coffee table every day. In a 36-inch hallway, you will brush against the console table. Your bags will bang into it. Your wet raincoat will drip on it.
Delicate finishes have no place here.
- Avoid: Soft pine, unsealed matte paints, and sharp metal corners that snag sweaters.
- Embrace: Hardwoods (oak, walnut), powder-coated steel, tempered glass, and rounded edges.
The Radiator Cover Hack
Here is a secret weapon for those with older homes: the radiator cover. Even if you don’t have a radiator, buying or building a slim radiator cover is a brilliant way to get a console table that is naturally very shallow (often 6-8 inches). They are designed to hug the wall and often feature grilles or lattice work that adds texture without bulk.
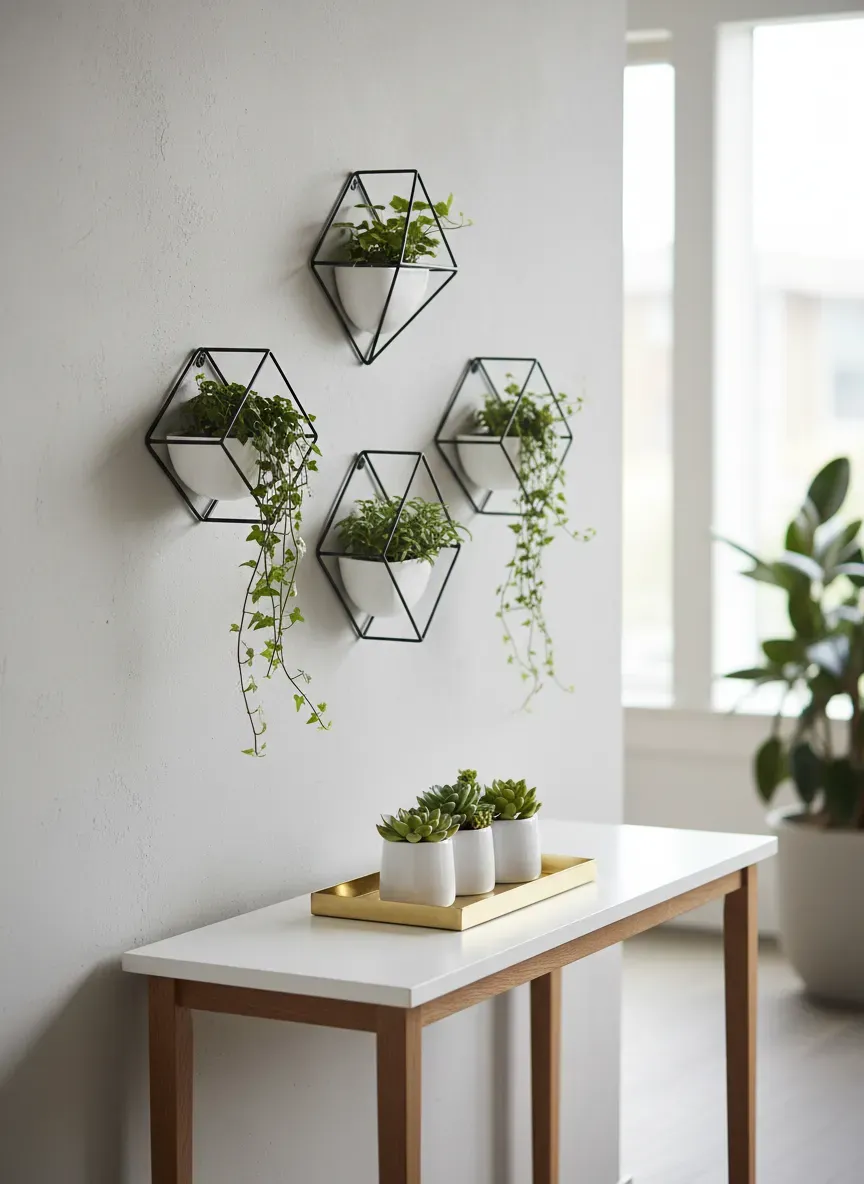
Styling Without encroachment
So you have the 10-inch deep console and the tilt-out shoe cabinet. How do you style them without re-creating the clutter you fought so hard to remove?
1. Wall-Mounted Decor: Instead of placing a vase on the table, mount a wall vase above it. 2. Trays are Mandatory: A tray creates a boundary. Keys go in the tray. If they are outside the tray, they are clutter. 3. The “Landing Strip” Concept: Keep the surface clear for temporary items (mail in hand, phone while tying shoes). If the surface is full of decor, it loses its utility.
For a masterclass in small-scale organization, I love the Umbra Trigg Wall Vessel. These geometric planters/organizers mount to the wall, keeping your limited flat surfaces free for the essentials while adding a sharp architectural vibe.
The Deep Dive: Specific Furniture Categories
Let’s break down exactly what to look for in the primary categories of hallway furniture.
The Bench
- The Problem: Standard benches are 15-18 inches deep. In a hallway, this is a tripping hazard.
- The Solution: Look for “saddle seat” benches or upholstered benches specifically designed for ends of beds, which often run narrower. Aim for 12 inches deep. If you can’t find one, a floating bench mounted to the wall (with proper support) allows you to customize the depth exactly.
The Coat Rack
- The Problem: Traditional tree racks have a wide base (18-24 inches) to prevent tipping.
- The Solution: Wall-mounted trees or flat-profile racks. There are modern designs that lean against the wall with two legs, anchored at the top. These provide the vertical storage of a tree with half the footprint.
The Library Table
- The Problem: You want books in the hall, but bookcases are huge.
- The Solution: Picture ledges. A series of picture ledges mounted vertically allows you to display books face-out. The depth required? roughly 3 inches. It turns your library into a gallery wall.
Common Pitfalls to Avoid
I’ve seen many well-intentioned hallway makeovers fail because of a few specific oversights.
1. Ignoring Baseboards: You measure the wall and buy a cabinet that fits perfectly. But you forget the baseboard. Now the cabinet sits 1 inch off the wall, creating a gap where mail falls and dust collects.
- Fix: Choose furniture with legs that are inset (set back) so the top can sit flush against the wall, or be prepared to scribe (cut) the baseboard.
2. The Door Swing Disaster: You place a slim bench behind the front door. It fits when the door is closed. But when you open the door, the handle slams into the bench, or the door only opens 80 degrees.
- Fix: Install a hinge-pin door stop to restrict the swing, or ensure your furniture placement clears the arc of the door completely.
3. Over-Hooks: Installing a row of 10 hooks looks efficient until you hang 10 coats. Suddenly, you have added 12 inches of bulk to your wall.
- Fix: Limit hooks to “current use” only. Off-season coats go in the closet.
The Bottom Line
Your hallway does not have to be a compromise.
By shifting your perspective from “fitting things in” to “optimizing flow,” you change the entire energy of your home. It requires a ruthless adherence to dimensions—rejecting anything that protrudes too far—and a creative approach to vertical space.
The goal is a space that feels airy, regardless of the tape measure. It’s about the tilt-out cabinet that hides the mess, the floating console that reveals the floor, and the lighting that banishes the shadows. When you respect the constraints of the tight hallway, you are rewarded with a space that functions seamlessly.
Go measure that corridor again. I bet you have more potential there than you think—you just need the right slim furniture to unlock it.